|
 |
 |
 |
 |
 |
 |
 |
 |
 |
 |
 |
 |
||||||||||||
 |
|
|
|
 |
  [SmartFox Pro] Realtime maze [SmartFox Pro] Realtime maze[ July 29, 2005 ] by Marco Lapi, a.k.a Lapo Article 6: create a real-time maze game protype for two players, concentrating on handling the basic logic of the game in an extension, and optimizing the amount of data sent between clients and server |
||||||||||||||||||||||||||
The related source file for this article is found in the "Examples/mx2004/pro_realtimeMaze" folder. INTRODUCTION In this tutorial we will put into practice what we have learned so far about SmartFoxServer PRO extensions, and we will create a real-time maze game protype for two players. We will concentrate on how to handle the basic logic of the game in our extension, and how to optimize the amount of data sent between clients and server. Specifically we will take a look at the ability of SmartFoxServer PRO to send very small messages using raw strings, bypassing the XML based protocol that is normally used. This feature is particularly important for all real-time applications where continuous updates are sent to one or more client. By using this technique you will be able to send the minimum amount of informations, achieving better network performance and saving a lot of precious bandwidth. Also we'll talk about time-based animations on the client side, an important technique for multiplayer games that need precise synchronization.
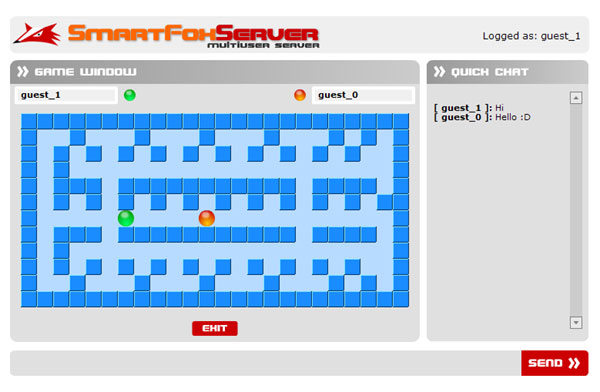
We are going to implement a simple tile-based game where two players can move around in real-time, and we'll have a look at the techniques that are necessary to achieve the best network performance and synchronization.
Before we start with the code analysis it would be a good idea to list the behaviors that our server-side extension will perform: 1) Wait for two players in the room, when both of them are inside, the game will start.
The client is going to play an important role. It will be responsible for one of the most critical aspects of real-time games: synchronization. Keeping the two client sprites synchronized in a LAN wouldn't be very difficult, there's plenty of bandwidth and an almost insignificant lag, so you could just send player updates to each client and perform the animations when the message is received. Unfortunately this approach would not work on a real server connected to the internet. If you're lucky you may get a lag of a few centiseconds which would already affect synchronization, but you may also stop receiving packets for a few seconds and in that case you would be completely out of synch. Another problem is the rendering speed of each client. Let' suppose that Mark and Paul are playing the same game. To solve these problems efficiently we will have to change the way animations are perfomed in Flash, using a time-based approach instead of the common frame-based technique. A time based animation always takes the same amount of time to execute on whatever hardware, be it Mark's slow Pentium2 or Paul's shiny new computer. By using the time as a constant in rendering animations we make sure that the rendering time will be the same on all clients. Also we will keep a queue of server updates in each client so that if a new update is received in the middle of a rendering it won't be lost.
This will also help us in determining if the client is getting out of synch: in an ideal scenario each time you look inside the queue you should always find it empty or with one item only. This would mean that as soon as you get a new message you render it on the screen and you go back to the queue to check the next update.
Now you can open the source .FLA file and inspect the code under the "chat" label. Most of the code found here is identical to all the previous examples, however when creating a new game room we pass a new parameter containing the name of the extension that we want to load: function createRoom(name:String, pwd:String, spec:Number)
{
hideWindow("newGameWindow")
var gameRoom:Object = new Object()
gameRoom.name = name
gameRoom.password = pwd
gameRoom.maxUsers = 2
gameRoom.maxSpectators = spec
gameRoom.isGame = true
gameRoom.isTemp = true
xt = {}
xt.name = "maze"
xt.script = "mazeGame.as"
gameRoom.extension = xt
smartfox.createRoom(gameRoom)
}
Now that the room is properly created and the extension is loaded we can move to the "game" label: import it.gotoandplay.smartfoxserver.*
stop()
_global.gameStarted = false // global flag for tracking the game status
var extensionName:String = "maze" // Name of the extension that we'll call
var win:MovieClip // A movieclip used for dialogue windows
var myOpponent:User // My opponent user object
var player1Id:Number // Id of player 1
var player1Name:String // Name of player 1
var player2Name:String // Name of player 2
var player2Id:Number // Id of player 2
var tileSize:Number = 21
var playerSpeed:Number = 100 // Expressed in milliseconds
var obstacles:String = "X" // String containing all the letters used
// as obstacles in the map. X represents a wall
gamePaused("") // pause the game
//----------------------------------------------------------
// Game Board
//----------------------------------------------------------
gameBoard = []
gameBoard[0] = "XXXXXXXXXXXXXXXXXXXXXXXX"
gameBoard[1] = "X..X...X...X...X...X.X.X"
gameBoard[2] = "X.X.X.X.X.X.X.X.X.X.X..X"
gameBoard[3] = "X.X....................X"
gameBoard[4] = "X.XXX.XXXXXXXXXXX.XXXX.X"
gameBoard[5] = "X.X.X.X.X.X.X.X.X.X.X.XX"
gameBoard[6] = "X......................X"
gameBoard[7] = "X.XXX.XXXXXXXXXXX.XXXX.X"
gameBoard[8] = "X.X....................X"
gameBoard[9] = "X.X.X.X.X.X.X.X.X.X.X..X"
gameBoard[10] = "X..X...X...X...X...X.X.X"
gameBoard[11] = "XXXXXXXXXXXXXXXXXXXXXXXX"
var map = []
// Draw the map on screen
drawBoard()
// Draw the map on screen
function drawBoard()
{
var tile
var mc
var lvl = 0
// Cycle through each line
for (var i:Number = 0; i < gameBoard.length; i++)
{
// Cycle through each chracter
for (var j:Number = 0; j < gameBoard[i].length; j++)
{
var c = gameBoard[i].charAt(j)
if (c == "X")
tile = "tile_wall"
else
tile = "tile_floor"
// Attach the tile
mc = boardMC.attachMovie(tile, "t_" + j + "_" + i, lvl++)
mc._x = tileSize * j
mc._y = tileSize * i
// Setup a bi-dimensional array to keep a copy of the game map
if (map[i] == undefined)
map[i] = []
map[i][j] = c
}
}
}
In the first lines we setup the variables needed for the game, the player IDs, player names, the size of the tiles, etc. Once the game board is drawn on screen, the gamePaused() method is called and a dialog box will appear waiting for the other player. From this moment the game will wait for events coming from our server extension.
Essentially the extension will be able to send three different events:
Now we can have a look at the server code: var numPlayers // count the number of players currently inside
var users = [] // an array of users
var gameStarted // boolean, true if the game has started
var currentRoomId // the Id of the room where the extension is running
var p1id // userId of player1
var p2id // userId of player2
function init()
{
numPlayers = 0
gameStarted = false
}
function destroy()
{
// Nothing special to do here
}
We keep a variable called numPlayers to keep track of the number of players currently in the room and a list of players called userList. Each time a new player enters we'll receive and internal event (userJoin) that is handled in the handleInternalEvent() function.
function handleInternalEvent(evt)
{
        evtName = evt.name

        // Handle a user joining the room
        if (evtName == "userJoin")
        {
                // get the id of the current room
                if (currentRoomId == undefined)
                	currentRoomId = evt["room"].getId()

                // Get the user object
                u = evt["user"]

                // add this user to our list of local users in this game room
                // We use the userId number as the key
                users[u.getUserId()] = u

                // Increase the number of players
                numPlayers++

                if (u.getPlayerIndex() == 1)
                	p1id = u.getUserId()
                else
                	p2id = u.getUserId()

                // If we have two players and the game was not started yet
                // it's time to start it now!
                if(numPlayers == 2 && !gameStarted)
                	startGame()

        }

        // Handle a user leaving the room or a user disconnection
        else if (evtName == "userExit" || evtName == "userLost")
        {
                // get the user id
                var uId = evt["userId"]
				var u = users[uId]

                // Let's remove the player from the list
                delete users[uId]

                numPlayers--

                gameStarted = false

                if(numPlayers > 0)
                {
                        var res = {}
                        res._cmd = "stop"
                        res.n = u.getName()
                        _server.sendResponse(res, currentRoomId, null, users)
                }

        }
}
As you can see in the code we add the new player to the userList array, using its userId as the key. It's always a good idea to keep track of users using their numerical ID as this number is unique. In the next line the numPlayers variable is incremented. Finally, if there are two players in the room the "start" event can be sent to both clients, calling the gameStart() function. When a user leaves the room or gets disconnected, the event is handled by removing the player from the list and decreasing the numPlayer variable. Also a "stop" event is broadcasted to the clients so that the game is paused. (continues on page 2) | ||||||||||||||||||||||||||
|
|
||||||||||||||||||||||||||
|