The related source file for
this article is found in the "Examples/avatarChat" folder
under the name of "avatarChat.fla".
In this article I am going to show you how to build a simple multi-room
avatar chat application using the concepts explained so far and
introducing a new interesting server-side feature: User
Variables.
These are the main features we're goin to implement:
» when a user logs in he will be displayed with a randomly
chosen avatar
»
the user will be able to move his avatar around in the chat area
»
all the users will see the other avatars moving and interacting
in real time
»
when a user sends a public message a small bubble will appear above
it, showing the message
[ VARIABLES EVERYWHERE ]
One interesting aspect of creating multiuser applications is that
sometimes the client application must be able to play different
roles at one time. For example in a multiplayer turn-based game
the same client application handles the game turns, playing the
role of both the idle player and the active player depending on
which user is currently interacting with it.
In this sample application we will start learning how it is possible
to create such a flexible behaviour.
One important tool to achieve this results is "server
variables". What's the difference between a server variable
and a regular one? The main difference is that the first one (as
the word says)
is stored in the
server and then broadcasted to all other clients in the room. This
means that one change in a user variable will be reflected to all
other users within the same room so that they can update the scene
accordingly.
In our "Avatar Chat" we will have many
users in one room all represented by one icon or graphic item and
each of them will be
able to move around a certain area of the screen, so we will need
to get constant updates from all the clients to keep the scene
in sync.
In our specific case we need two variables, x
and y, that represent the position of our avatar
on the screen. When we create or update this variables all the other
clients in the room will be notified and they will be able to put
our icon in the right place, keeping the interaction in sync.
SmartFoxServer supports two different types of server variables
called "User Variables" and "Room
Variables".
We will concentrate on the first ones for now and we'll encounter
the "Room Variables" in the next tutorials, when dealing
with a turn-based
board game.
[ LET'S DIVE IN ]
You can now open the source FLA file and inspect it.
You will notice that the code in "connect" label is the
same that we used in the previous examples, so you can move in
the next label
called "chat".
The only thing that changes in this section is this:
#include "lib/[flashAPI].as"
#include "lib/easingEquations.as"
#include "lib/easing.as"
These include commands import some extra usefull actionscript
code that we will use later for the avatar movement.
Now open the library (F11) and find the movieclip called "avatar" in
the "_Avatars" folder.
This is the main movieclip used to represent one user on the screen
and it's made up of basically 3 parts:
1 - the "disc" movieclip, which in turn
contains 8 differently colored circles, one per frame
2 - the "bubble" symbol that we'll use
to show public messages
3 - the "name" text field that will show
the user name
We will instantiate on screen on of these symbols for each client,
generating an initial random position on screen and a random color.
Also we will keep your avatar on top of the others in order to
make it easier to move around.
In the actionscript layer of the "avatar"
symbol you'll find this code:
- this.bubble._visible = false
- timer = null
-
- function deactivate()
- {
- timer = setInterval(closeBubble, 3000)
- }
-
- function closeBubble()
- {
- bubble._visible = false
- clearInterval(timer)
- }
First of all the bubble is hidden as soon as the avatar is instantiated.
The next two functions are used to close the message bubble after
3 seconds: the setInterval() function allows to
repeatedly call a method() at a certain time rate,
expressed in milliseconds. In order to do this operation once we
will use the clearInterval command as soon as the
closeBubble() method is invoked the first time.
This way we can show the message bubble when a message arrives
and automatically close it after three seconds. If you wish to change
this amount of time adjust the second argument in the setInterval
function.
Now you can return to the main scene, positioning the playhead
on the "chat" label.
First we setup some global scope
variables:
areaW = 600
areaH = 335
avatarW = 40
avatarH = 40
These variables represent the width and height of the avatar area
as well as the avatar size.
Then we setup the mouse listener to capture the user mouse clicks:
- myMouse = {}
- myMouse.onMouseDown = function()
- {
- if (inited)
- {
- if (!_global.isBusy)
- {
- var px = int(avatarMC._xmouse)
- var py = int(avatarMC._ymouse)
-
- if ((px > avatarW/2) && (px < areaW - avatarW/2) && (py > avatarH/2) && (py < areaH - avatarH/2))
- {
- // save new variables
- // Please note that init is set to false:
- // this means that we're only moving somewhere and we don't need to init tha avatar
- smartfox.setUserVariables({px:px, py:py, init:false})
-
- // method derived from the [flashAPI].as
- // moves the mc using the "Quint" equation, with "InOut" easying
- // to the new px,py position in 100 milliseconds.
- myAvatar.easingTo("Quint", "InOut", px, py, 100)
- }
- }
- }
- }
myMouse is the object that handles onMouseDown events fired by
the built-in Mouse object.
inited is a boolean flag that is set to true once a user has successfully
joined a room
_global.isBusy is an already known variable and
we've already discussed it here
Once we have checked that the mouse click occured within the boundaries
of the "avatar area" we can set the user
variables and move the avatar. Essentially we're saving as "User
Variable" the new avatar position and this information will
be sent also to all the other users.
Setting user variables is straightforward: you create an object
with variables in it and pass it to the API setUserVariables()
method.
In the above example we have used a more compressed syntax with
literals but we could have written the same thing like this:
- vars = new Object()
- vars.px = px
- vars.py = py
- vars.init = false
- smartfox.setUserVariables(vars)
Basically all variables contained in the object will be saved
on the server and transmitted to all other users in the room.
Now you may want to ask, what kind of variables can I use?
Both "User Vars" and "Room Vars" (which we'll
encounter in the next articles) accept simple types or primitives:
- Number
- String
- Boolean
- null
It's not possible to save obejcts, arrays, etc...
However SmartFoxServer has a function called sendObject() which
enables you to sent all kind of complex objects to the server
and have the other clients receive it transparently, but we'll
concentrate on that feature in a specific tutorial.
One nice thing that the setUserVariables allows to do is to set/update
many variables all in one shot, just like we did in the
above example.
The next line of code is:
- myAvatar.easingTo("Quint", "InOut", px, py, 100)
myAvatar is the name of our avatar (more about it in a moment)
and the easingTo() method is part of the great
[flashAPI]
project
and allows us to
have a very nice animation with easing all via actionscript!
[ CREATING OUR AVATAR ]
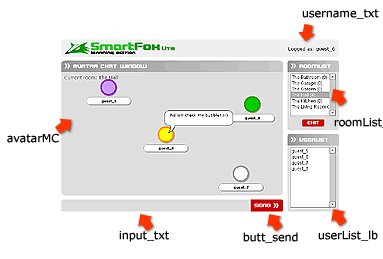
In the main timeline you will find an empty movieclip called
"avatarMC" (avatarMC layer). This is
the clip were we're going to attach all the user icons.
Now let's see what is going on in the onJoinRoom
event handler:
- smartfox.onJoinRoom = function(roomObj)
- {
- cleanAvatars()
-
- var roomId = roomObj.getId()
- var userList = roomObj.getUserList()
-
- resetRoomSelected(roomId)
-
- _global.currentRoom = roomObj
-
- // Update Room Name in the avatar area
- currentRoom.htmlText = "Current room: <b>" + roomObj.getName() + "</b>"
-
- // Clear current list
- userList_lb.removeAll()
-
- for (var i in userList)
- {
- var user = userList[i]
- var uName = user.getName()
- var uId = user.getId()
-
- userList_lb.addItem(uName, uId)
-
- if (uName != _global.myName)
- {
- var uVars = user.variables
-
- var mc = avatarMC.attachMovie("avatar", "avatar_" + uId, Number(uId))
- mc._x = uVars.px
- mc._y = uVars.py
- mc.disc.gotoAndStop(uVars.col)
- mc.name.text = uName
- }
- }
-
- // Sort names
- userList_lb.sortItemsBy("label", "ASC")
-
- setupMyAvatar()
- }
The first part of the code will look familiar as its almost the
same as we used before except for the first line: the method cleanAvatars()
will clean the avatarMC, removing all attached movieclips.
The most important part of the code is in the userList loop: this
time not only we add the user names in the right list box component,
but we also create all the other user avatars
and put them on screen.
The "variables" property of the API
User object is an associative array and you can
retrive any user variable by simply using its name as a key or with
the dot syntax. Example: if you want to retrieve the "speed"
variable from the user you can write:
- var speed = user.variables["speed"]
or
- var speed = user.variables.speed
In the user list loop we read three variables for each client:
px, py and col, where "col" represents the
frame number corresponding to the color of the disc inside the
avatar symbol.
The code instantiates a new avatar clip and then
initializes it. Please note how the client id was used to
create both an unique id for the movieclip and it's level number.
The last line of the function invokes the setupMyAvatar()
method:
- function setupMyAvatar()
- {
- if (!inited)
- {
- var col = int(Math.random() * 8) + 1
-
- myAvatar = avatarMC.attachMovie("avatar", "avatar_" + smartfox.myUserId, 99999)
-
- myAvatar.disc.gotoAndStop(col)
- myAvatar.name.text = _global.myName
-
- var px = int(Math.random() * (areaW - myAvatar._width / 2))
- var py = int(Math.random() * (areaH - myAvatar._height / 2))
-
- myAvatar._x = px
- myAvatar._y = py
-
- // Store the avatar position on the server
- smartfox.setUserVariables({px:px, py:py, col:col, init:true})
-
- inited = true
- Mouse.addListener(myMouse)
- }
- }
At this point of the execution flow the inited
variable is set to false, so the code in this function is executed.
What do we use this boolean flag for? Basically we want to setup
our avatar symbol once, and if we will change room later we want
this portion of code to be skipped.
Infact you can see that in the end we set the flag to "true" so
that the next time this function is called it will do nothing.
Alternatively we could have moved this check in the caller function.
Anyway you put it the result won't change. :-)
Our avatar color is created randomly choosing a integer number
between 1 and 8, then we will use this value to gotoAndStop()
the disc movieclip inside the avatar.
Once the symbol has been set up we save our user variables. Please
note that we're saving an extra flag (init, set
to "true") together with the other variables that we have
already talked about. The flag is used to tell the onUserVariablesUpdate
event handler (more on this in a moment) if we're initializing the
avatar clip for the first time or if we're just moving it around
the screen.
The "onUserVariablesUpdate" event is
fired everytime another users has initialized or updated his/her
user variables.
- smartfox.onUserVariablesUpdate = function(user)
- {
- var currRoom = this.getActiveRoom()
- var id = user.getId()
- var uVars = user.variables
-
- if (uVars.init)
- {
- var mc = avatarMC.attachMovie("avatar", "avatar_" + id, Number(id))
-
- mc._x = uVars.px
- mc._y = uVars.py
- mc.disc.gotoAndStop(uVars.col)
- mc.name.text = user.getName()
- }
- else
- {
- var mc = avatarMC["avatar_" + id]
- mc.easingTo("Quint", "InOut", uVars.px, uVars.py, 100)
- }
- }
The user object is passed as an argument so you can easily retrieve
it's new variables values and update the on-screen status.
If the init flag is set to "true" then
a new user has just entered the room and we need to initialize its
avatar, otherwise we receive a position update and we need to activate
a new animation.
Since we call every user icon like "avatar" +
userid, we can easily find the right movieclip to move,
by using the client id (last two lines of the function).
[ HANDLING ROOM CHANGES ]
Another important aspect of our application is handling the room
changes correctly. In the previous chat examples everytime a
new user entered or left a room the userlist component was updated.
This time we will also need to take care of the avatar movieclips.
Here's
the code for the onUserEnterRoom handler:
- smartfox.onUserEnterRoom = function(fromRoom, user)
- {
- userId = user.getId()
- userName = user.getName()
-
- // Add user to the userList listbox
- userList_lb.addItem(userName, userId)
-
- // Sort names
- userList_lb.sortItemsBy("label", "ASC")
-
- updateRoomStatus(fromRoom)
-
- // Show the user avatar
- var mc = avatarMC.attachMovie("avatar", "avatar_" + userId, userId)
-
- mc._x = user.variables["px"]
- mc._y = user.variables["py"]
- mc.name.text = userName
-
- mc.disc.gotoAndStop(user.variables["col"])
- }
The code remains almost the same of the previous examples as we've
only added a few line at the end to properly display the
symbol of the user that has just joined.
Same thing for the onUserLeaveRoom event:
- smartfox.onUserLeaveRoom = function(fromRoom, usrId)
- {
- for (var i=0; i<userList_lb.getLength(); i++)
- {
- var item = userList_lb.getItemAt(i)
-
- if (item.data == usrId)
- {
- var usrName = item.label
- userList_lb.removeItemAt(i)
- break
- }
- }
-
- // Destroy avatar from screen
- avatarMC["avatar_" + usrId].removeMovieClip()
-
- // Sort names
- userList_lb.sortItemsBy("label", "ASC")
-
- updateRoomStatus(fromRoom)
- }
Here too the code is the same we've used before, plus one line
that removes the moviclip of the user that left the room.
[ PUBLIC MESSAGES ]
The last part that we need to cover is sending public messages.
As we said at the start of the article we would like to have each
message appear inside a bubble above the avatar.
Here's the slightly modified onPublicMessage event handler:
- smartfox.onPublicMessage = function(msg, user)
- {
- var mc = avatarMC["avatar_" + user.getId()]
- if (msg.length > 50)
- msg = msg.substring(0,48) + "..."
-
- mc.bubble._visible = true
- mc.bubble.message.text = msg
- mc.deactivate()
- }
First we get a reference to the right avatar clip, then we set
the bubble textfield and finally show the bubble.
The last line of code calls the deactivate() method
that we've already talked about.
Since our textfield is pretty small it allows only two lines of
text, so we cut the string down to 50 characters which indeed is
not very much space.
[ CONCLUSIONS ]
That's all about our simple "Avatar Chat"
application. As you may have noticed this application could be enhanced
by adding a "message history" that could keep track of
the messages sent by the users, and those bubbles could stretch
dynamically based on the amount of text.
Also if you already have experimented with isometric tile engines
it would be great to use one of those to create a multiplayers 3D
interactive environment with different characters ala "Habbo
Hotel". It would not be too difficult now that you know how
to deal with the server side :-)
See you in the next article!
Lapo
| 


 [SmartFox] Avatar chat