 |
 |
 |
 |
 |
 |
 |
 |
 |
 |
 |
  |
 |
||||||||||||
 |
|
|
|
 |
|
||||||||||||||||||||||||||
|
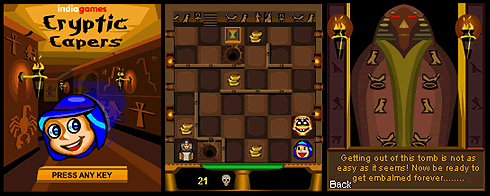
introduction Developing games based on Macromedia Flash technology has always been a great delight, because the possibilities for innovation are endless. With Flash, you can create great-looking scalable graphics that are easy to edit and write complex code that is simple to debug and test. I've been working with Flash for more than four years now. I got my first taste of ActionScript with Flash 4. Since then I have developed numerous games for Indiagames for the Internet, CD-ROMs, and now for handheld devices (using Macromedia Flash Lite technology). It was a lot easier for me to adapt to and create Flash Lite games, because Indiagames already has a very strong mobile games portfolio of J2ME, BREW, and Symbian games. Flash Lite is a perfect fit for our business strategy. Looking at our Flash Lite game portfolio so far, you may find it hard to believe that we only started developing games with Flash Lite 1.1 last year: We developed Cryptic Capers—a game that won the Best Game award in the Macromedia Flash Lite Content Contest in Fall 2004 (see Figure 1). At the time, we made the strategic decision to learn the ins and outs of Flash Lite by developing an application instead of approaching the technology by learning to use its syntax first and then applying our knowledge to a product.
Figure 1. Cryptic Capers won the Best Game award at the first Macromedia Flash Lite Content Contest In this article, I share some of my knowledge and experience of developing complex games like Cryptic Capers within a restricted Flash/ActionScript environment with Flash Lite. Along the way, I will provide optimization tips that will be useful to everyone who wants to create complex games. Requirements To complete this tutorial you will need:
Prerequisite knowledge: This article is for experienced Flash developers with some Flash Lite experience and a working knowledge of Flash 4 syntax. The Art of Storyboarding Before you start developing a game, you should consider the kind of game that would work well on mobile phones. As a game developer, it will be extremely easy for you to let your thoughts flow towards creating side-scrollers or isometric and complex action and puzzle games for your portfolio of Flash Lite games. Remember, however, that you are dealing with Flash on mobile devices. These devices have limited processing power and memory—the Flash Lite player rendering is not as powerful as that of Flash Player on desktop computers. So, it is always best not to take risks with games that are too difficult and instead stick to a design that is simple and intuitive. Getting a handle on your concept Before finalizing a concept, you should abide by the following:
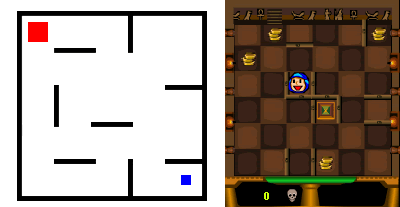
Keeping all of the above in mind, your audio-visuals must be great, and in sync with the game. After all, Flash has to live up to its reputation! Thinking about the storyline With your basic concept flushed out, try developing a gripping backstory for supporting the gameplay. However, be sure that the backstory is not the focal point of your game; it should be created only if it is applicable to the game. For example, the idea of Cryptic Capers came from an old Java game called Tilt Maze that used simple blocks (see Figure 2). The gameplay was so addictive and not at all outside the realm of what one can do with Flash Lite. So we created a simple backstory of an Egyptian explorer trapped in a pyramid with mummies and other such enemies to support the game (see Figure 2). This backstory blended really well with the gameplay. Of course, a story like this would not have been possible if we were developing a game like Tetris or Mahjong.
Figure 2. The Java Tilt Maze game (left) and Cryptic Capers (right) When a story is ready, you need to work on developing the gameplay. It really doesn't matter if your game is easy or difficult. All that matters is that it should capture the player's imagination, involving him or her in the experience. You should work towards creating a game that leaves the player with the feeling of "I want more!" You should also create a storyboard for every important screen of your game, so that you have a rough visual idea of your final product. Keep an open mind for changes when it comes to your storyboard; changes might occur during the course of development. These changes could relate to the game view (top view, side view, isometric view), gameplay, game characters, levels, obstacles, game animations and so on. If your storyboard is rigid, you will be bound by every idea you have written down, and thus will not be able to create a good game. The Game Body After you have a great idea cooked up, you will realize that not everything you thought of can be implemented. You will notice this as you get into the grind of development. KeyPress and KeyRelease events When we started our game, we wanted to get our character to move on a KeyPress event and stop on a KeyRelease event. However, no KeyRelease event existed because Flash Lite 1.1 does not support the KeyRelease event for mobile-specific keys such as Left, Right, Up, Down, or Enter. So we devised our own common method to control movements. If you haven't done so already, download and unpack the tutorial files that are part of this article and open sample file cc_file1.fla to view the code we came up with. If you want to write the code on your own, launch Flash MX Professional 2004 and create a blank new movie with the size of 176x208. This is a standard size for all Nokia Series 60 devices. Change the player version to Flash Lite 1.1 from the Publish Settings option on the File Menu. You can also use the Mobile Device template option when creating a new movie. This enables you to view and select from the multiple Flash Lite devices available for development (you can find more templates created by David Mannl).
on (keyPress "<Left>") {
    dir = 1;
    tellTarget ("loop") {
        gotoAndPlay ("playLoop");
    }
}
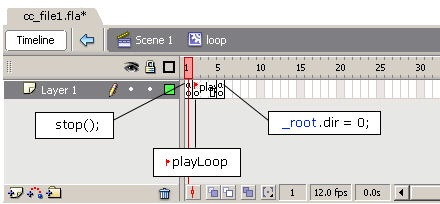
Figure 3 shows an exact representation of the loop movie clip symbol.
Figure 3. The loop movie clip symbol In the above example, when a left key on your mobile phone is pressed, the loop movie clip which is initially paused on the first frame, will start playing the frame labeled playLoop. The Button script will keep executing the Left Key script for as long as the left key is pressed. This also means that the Timeline in the loop movie clip will not move beyond its current frame, playLoop. However, after the left key is released, the indicator in the Timeline of the loop movie clip will move ahead and reset the root variable dir to 0 on its last frame, and then will go and stop on the first frame. Meanwhile, the moving character keeps reading the dir variable value and moves if it is set to 1 or stops if it is set to 0. We found this to be the best implementation for key-related movements. hitTest functionalityAnother important element that you should be aware of, because it is the most used element in all games, is the hitTest element. The hitTest element was most critical in our case as every instance on the Stage was colliding with another instance on the Stage. Open sample file cc_filel2.fla to view the complete code. Alternately, you can also follow the explanation of a basic collision test between two objects on the Stage by looking at the following code snippet: myWidth = getProperty ("", _width);
myHeight = getProperty ("", _height);
myX = getProperty ("", _x);
myY = getProperty ("", _y);
chX = getProperty ("_level0/1", _x);
chY = getProperty ("_level0/1", _y);
if (Math.abs(chY-myY)<myHeight/2 and Math.abs(chX-myX)<myWidth/2) {
//hitTest successful
}
The above script checks for simple collisions or overlapping of two movie clips. Suppose that you have two movie clips named A (character) and B (trench). The collision script is present in movie clip B. The variables myWidth and myHeight stores movie clip B's width and height using the getProperty method. Similarly myX and myY stores its x and y values. chX and chY refers to the x and y values of movie clip A. Here is the script to check the condition for collision: if (Math.abs(chY-myY)<myHeight/2 and Math.abs(chX-myX)<myWidth/2) {
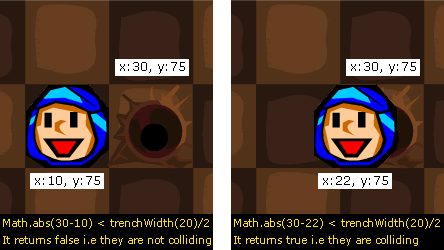
The Math class, as you might know, is used for operating your mathematical calculations. You can use one such method — Math.abs(num) — to receive an absolute number from your calculation. In your hitTest calculation, you can use this method to find out an absolute value of the distance between movie clip A and movie clip B. Assuming that the center points in both movie clips are actually centered, their distance on the x coordinate can be calculated by arriving at the difference in their x coordinates Math.abs(chX-myX) (see Figure 4).
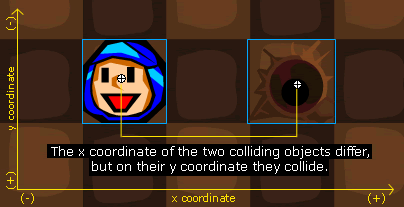
Figure 4. Stages of a character colliding with the trench in the game If this value is less than half of movie clip B's width, then the two objects would be colliding on the x axis. However, colliding only on the x axis is not enough because on their y axis, the movie clips could still be far apart. Thus, when you write your if condition for collision detection, make sure that the condition checks for movie clip collision on both axes. Refer to Figure 5 for the graphical explanation.
Figure 5. The two colliding objects will need to check for a hit on both X and Y coordinates Timers in games Most games use timers to either reward players with bonuses when the game is completed within the time limit or to enable players to challenge themselves or others to compete for a high score in a time-based game. In Cryptic Capers, although the timer is not visible to the player, it contributes to higher scores when a level is completed within the stipulated time. We prefered using the traditional Flash 4 method of calculating time. This method uses a movie clip that has a Timeline extended up to the frame rate to which you set the Flash movie. For example, if your movie is set to 12 frames per second (fps), then you can extend the timer movie clip Timeline up to frame 12. Every time the movie clip runs from frame 1 to frame 12 in your game, the movie will actually be completing a one-second run. You can store this value and increment it in a second variable. Similarly, you can declare and increment a minute variable every time your second variable reaches 60. This method is infallible because the timer will tick according to the fps rate at which the game runs on the device. For instance, if the fps rate of your game falls to 9 on the device, the movie clip will also run at 9 fps. Another method you can use for calculating time is the getTimer() method, which outputs the time in milliseconds since the Flash movie was opened and played. If you want to create a timer similar to ours, open sample file cc_file3.fla and see its implementation in a time-based Flash Lite game. Platform compatibility check Platform compatibility check is important, especially when you are creating content that is supposed to run on multiple devices. The script in the sample file, cc_file4.fla, checks for the device name so that the necessary game controls can be made available to the player to play the game. The sample file cc_file4.fla contains the following script, which addresses cross-device compatibility issues: txt = FSCommand2 ("GetDevice", "device");
if (txt >= 0) {
if (device eq "Sony Ericsson P900" or device eq "Sony Ericsson P800") {
gotoAndStop (2);
//Use of joystsick
} else {
stop ();
//Use of num pad and joystick
}
}
Using FSCommand2, you can detect the device on which your content is running. Based on the device type (for example, device-supporting keys or device-supporting stylus), you make the necessary controls available to the player. |
||||||||||||||||||||||||||
|
||||||||||||||||||||||||||
|
||||||||||||||||||||||||||


 Cryptic Capers: Best Practices for Mobile Game Development

